The Photoshop CC “Select and Mask” tool for sky replacements in real estate photography – does it work well, and how long does it take to replace a sky?
In this video I go through three different exterior shots replacing the sky using the new “Select and Mask” tool from Photoshop CC. This tool was only released a few days ago so I haven’t yet had long to play with it and work out any ninja tricks, but my first impressions are that it did quite a good job. However, there are a couple of options I would recommend selecting to make it as easy as possible:
So here are the steps you want to take when using the Select and Mask tool:
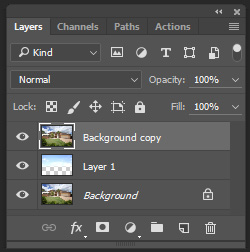
 Duplicate the background layer (the photo of the house).
- Add the sky layer in the middle between the background layer and the copy of the background layer. Note: Just be sure to line up the horizon line on your sky photo so it matches the horizon on the house photo.
- Click on Select in the menu, then Select and Mask.
- Lower the transparent to about 50% so you can see the sky, and some of the house photo appearing below it.
- Use the Quick Selection Tool and with a large brush, paint over the house and the trees, but be sure not to paint over any of the sky at all.
 Open Edge Detection in the options panel for the Select and Mask tool, and change the radius to 1 to 10 pixels, or check Smart Radius (which sets Radius to 10 pixels).
- Use the Refine Edge Brush over the edges, drawing on the house and the trees. A large brush can work well when painting over the trees where there are areas of sky in between the branches.
- Optional: It sometimes works to select Decontaminate Colors under the Output Settings in the options panel to prevent areas of sky from covering over trees or parts of the house. Sometimes this works, and sometimes it doesn’t – it seems to depend on the sky in the original house photo.
- Check over carefully – you may need to carefully go over some areas with the Quick Selection Tool again.
- In the options panel, make sure output is set to “New layer with layer mask“, as this will create a new layer and automatically apply the mask to it.
- If everything looks good, click OK.
If you find any other techniques to make the Select and Mask tool work even better for sky replacements, please leave a comment below. I’d greatly appreciate hearing about anything else you pick up.
